Page 13 will be the final page of my Baby Album #1. I couldn't find a better way to end this album than with an angelic picture of my baby boy.
I was able to find a 12x12 cloud background made out of vellum but it was so thin I had to adhere it to a piece of cardstock. Making it stick to the cardstock was a challenge but after applying a few glue dots on top of vellum tape it took hold. It did raise in some areas but that was ok as it just gave more dimension to the clouds.
I added the title "My Angel" with glitter letter stickers and added a gold and red swirl embellishment to the top center of the cardstock. I had some white glitter flowers (of course) so I used them as clouds for added dimension.
I then started working on my little angel. I took a 4x6 christening picture and added 2 angel wings to each side. For the halo I used a crystal gem frame.
I wanted to include a poem so I wrote one up on my computer and printed it off on cardstock. I changed the colors to match my layout with distress ink.I cut out a scrolled frame and stuck the poem on top. I outlined the edges with a silver marker and added a few gold gems and an angel charm as embellishments. I adhered the picture and poem onto a delicate piece of lace paper. I tied it all together by adding a silver cyrstal gem frame to the bottom corner. I finished the page off by adding a large white glitter flower and a smaller dark blue flower to the center.
Well this now completes Baby Ablum #1.
I hope you enjoyed the album and picked up a few ideas along the way to help you start or complete your own.
I will be posting other projects as well which are focused on stamping and cardmaking, so stay tuned!
Monday, September 7, 2009
Baby Album - Page 12
Page 12 of the baby album, is a collection of pictures of my son's first few weeks. I had them digitally formated, grouped together and printed out as 8x10 picture.
I framed the picture on a lime green colored cardstock, applied green distress ink around the edges and then carefully tore each side of the cardstock to give it a distress look. I cut a flower in half and added it to the top right corner of the frame.
I then adhered the framed picture onto a 12x12 light blue pokadot cardstock with scalloped edging. I found some ribbon that matched my pokadot cardstock and I added 2 glitter flowers in the center of the ribbon. I positioned the ribbon on the left side of my picture frame.
Now for the grand finale, I framed each individual picture with guess what... GLITTER!!, yes my addiction is now in the open... there's no stopping me now.
Baby Album - Page 11
Page 11 of the baby album is a full 8x10 picture of my son Kassidy framed onto 2 pieces of cardstock.
I first framed the picture about a 1/2 inch larger than the picture itself on a light green cardstock. I wanted the frame to pop out and not just be a solid color so I used a couple of distress ink colors and inked all around the edges of the frame. Then I took a stamp and inked it in versamark (clear and sticky like glue) and then stamped the edges of my frame. I added white shimmery embossing powder all over and heat embossed the edges.
I followed the same embossing process for the 12x12 baby blue cardstock and now both cardstocks flow well together. I cut out my son's name with my electric alphabet cutter, then applied glue with a very thin glue stick and poured glitter all over the letters. I added a few gem stones under the corner page to give it that final touch. Love it!!
I just happened to have a bow that had the same embossed looked as my cardstocks so I added it to the left bottom corner of my picture frame and added a glittered flower to the center, so cute.
I really wanted to add some flowers to the layout but wanted to keep it 'boyish' so I bunched a couple of white, blue, yellow and brown flowers together, added glitter onto the darker ones, and much to my surprise it didn't look girlish at all. Just adorable!!
Baby Album - page 10
Well, it's evident now, I like to have both pages that face open in my album to coordinate with one another. So since I titled page 9 ' A Star is Born' and '3rd Week of Stardom', it was only clear that page 10 would be filled with stars.
I chose a cardstock background filled with stars and added three 4x6 pictures. I rounded off the edges of each photo and fit perfectly on the 12x12 cardstock. I then added some foam and plastic stars and added glitter all over them, the more the better... ;)
Since I hadn't framed the pictures due to the space limitations, I added glitter to the bottom of each picture to outline them a bit. I then also added silver crystal swirly corner frame (not sure what you call it) to the center picture and this was the final touch to my page. Since I had also added one of these on page 9 facing the other way, both pages are now in sinq with one another.
Sunday, September 6, 2009
Baby Album - Page 9
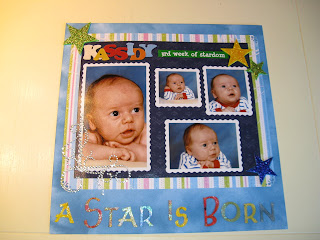
In 1999, a professional photographer came over to my home and took a few pictures of my 3rd week old son. So for $100 I got about six 3x5 pictures. I couldn't afford more back then but at least I got a few nice pictures. With today's technology, I was able to scan those small pictures onto my computer and turn them into beautiful 4x6 photographs. I even made an 8x10 which you'll see on another upcoming page.
Page 9 was done very differently than my earlier pages. I used a digital processing method to compute the pictures and that became my page layout.
I adhered the digital picture frame to a patterned cardstock, rounded the edges and used a design punch in each corner to give it a little bit of elegance. I then glued it to another cardstock that was light blue but I added some texture to it by applying blue distress ink and softly blending the darker color in circular motions over the cardstock. This gave a cloud effect which softened the background. I then added a few stars randomly around the picture frame and of course I added glitter all over them.
I felt the picture frame needed something else to pop off the page, so I added a silver crystal corner frame to the left side of the pictures and that just completed it to my liking.
Now the bottom part was just right to place a title so I used my electronic cutter to cut out 'A STAR IS BORN'. I inked each letter with a different pigment ink color and then poured clear embossing powder over each letter and heat embossed them. Now their all shinny like glitter, love it!
I truly love this page, just adorable!!
Baby Album - Page 8
Page 8 of the baby album is where my true love for glitter becomes apparent. Everything on this page is accented with glitter. To begin, I chose a dark blue glitter cardstock background to reflect night-time as this is a picture of my little boy asleep.
I had a cute little paper bag with the picture of a teddy bear asleep on a pillow resting on the moon. I decided to cut it out and add a picture of my son asleep on the pillow. It was perfect, so I continued the page layout by adding clouds, stars and a little poem.
I found a few clouds made out of thin wood as embellishments but they needed something to stand out as I found them dull looking. Glitter to the rescue... I added glitter all around the edges and gently rubbed more glitter on the inside of the clouds to give them that shimmering look.
I added a few more stars, some made out of foam and others felt and rubbed glitter all over them. I wanted to add a little poem to my page since my baby was sleeping amongst the stars. So I wrote a poem on my computer and printed it out on colored cardstock. I added it to different cardstock color paper and rubbed glitter all around the edges so that it blended in with all the other glitter elements on the page. Love it!!
I also outlined the moon in yellow glitter as the final touch to this page. My affection for glitter was now full blown and I just had to go out and buy it in every color possible...... I'm now officially addicted to glitter!!
Baby Album - Page 7
Wow, I finally now appear in page 7 of the son's baby Album. The cardstock I chose was baby blue in background and had an assortment of colored flowers. I colored in a few more flowers myself just to give it a little more brightness.
I added a transparency frame over the picture and adhered it together with vellum tape. Then I inked a light pink felt swirl with a darker pink color and then rubbed glitter all over it. I added a few plastic flower embellishments onto the swirl and a glitter flower in the center. I then added a few flowers on top of each other attached with a brad and adhered to the top left corner of the picture frame. So sweet!
Page 8 is soon to follow, stay tuned!
Baby Album - Page 6
The Easter theme is continued on page 6 of the baby Album. The background paper is busy with big colorful Easter eggs. I had a few Easter embellishments I wanted to add so in order to make them stand out I added a few foam dimensionals to the back to raise them off the background paper, makes them pop off the page.....so cute!
I framed two 4x6 pictures by simply adhering them to glittered cardstock and rounded off the edges with a corner rounder tool. I then added a strip of ribbon with writting on it that says 'It's a boy' to the top picture and a baby blue ribbon to the bottom picture frame which easily completes these 2 beautiful pictures.
Since the creation of my first album page I purchased a few more tools including a personal electronic cutting machine which allows me to cut beautiful designs and alphabets by simply using my computer and a software program I purchased seperately. I entered the letters 'My Baby' and welded them together which is an option the program provides. I then outlined the letters using a white gell pen and rubbed glitter over the letters to make them stand out a little more. Just adorable!!
I also added blue glitter to the little bunny embelleshments to make them look more boyish. The little duckling in the egg below was a girl but I simply changed that to a boy by adding a little blue bow to the side of the head. Now it's a boy duckling, perfect.
Well this now completes page 6 of the baby album. Here's a view of both pages 5 and 6 together.
Baby Album - page 5
My baby boy was born on Easter Sunday so page 5 and 6 of the baby album are dedicated to an Easter theme.
The cardstock was a little too busy for what I was going for so I decided to keep the outside squares and adhere a plain baby blue cardstock to the middle of the page. The Easter squares now act as a frame and outline my page just beautifully.
This page calls for an applause as I managed to pull off an embossing technique on my first try. The picture frame below was a regular unfinished chipboard piece. I inked it first with blue 'pigment' ink and then sprinkled embossing powder over the frame and heat embossed it, twice. The result was magical. I would have paid good money for a gorgeous frame like this..... but didn't :)
Next I took a 'shipping tag' and adhered it to a piece of pale cardstock. I then applied light green distress ink over the cardstock to give it another look. I tied a ribbon at the top and then attached a baby greeting sticker in the middle of the tag. Just lovely!
Onto page 6 now....
The cardstock was a little too busy for what I was going for so I decided to keep the outside squares and adhere a plain baby blue cardstock to the middle of the page. The Easter squares now act as a frame and outline my page just beautifully.
This page calls for an applause as I managed to pull off an embossing technique on my first try. The picture frame below was a regular unfinished chipboard piece. I inked it first with blue 'pigment' ink and then sprinkled embossing powder over the frame and heat embossed it, twice. The result was magical. I would have paid good money for a gorgeous frame like this..... but didn't :)
Next I took a 'shipping tag' and adhered it to a piece of pale cardstock. I then applied light green distress ink over the cardstock to give it another look. I tied a ribbon at the top and then attached a baby greeting sticker in the middle of the tag. Just lovely!
A few more little embellishments (rub on words, flowers, crown and tag) were added and this page to make it a simple yet beautiful page.
Onto page 6 now....
Baby Album - Page 4
Welcome to page 4 of my baby scrapbook album.
This page will also be placed alongside page 3 so I used another coordinating background page but cut it down, inked the edges with silver ink and then pasted it onto a blue cardstock to keep the theme with page 3.
I used my computer to write my sons name, date, time, place and weight of birth. I cut out the edges with wavy scissors and then inked the edges with a silver marker. I added a gold and silver ribbon and placed a few shinny stars around it. I placed a 4x6 picture of my son in his hospital incubator and afixed his medical wrist band inside the picture frame.
I added a few white flowers but they didn't stand out enough so I took a baby blue ink pad and rubbed the flowers in the ink to make them blue and added white glitter around the center to make them pop out more.... so easy.
I then cut out a cute giraffe made out of thin plastic material and added glitter to the feet, ears and chest. This altered the image to the effect I was looking for.
Hope this page inspires you, and now onto to page 5.
Saturday, September 5, 2009
Baby Album - Page 3
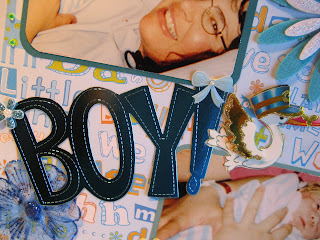
Page 3 of my baby album is showing off my beautiful baby boy!
I added two 4x6 pictures on a 'Boy Meets World' cardstock background... just perfect.
Just about everything is blue on this page but all the different color contrasts make it work. I cut out the image of a stork from a card I received and added it to the page, love it! I also cut out the word 'BOY!' from a wall hanging banner. 'IT'S A BOY!'
I added a few baby bows and glitterd flowers, and there it is, page 3 of my baby album.
Baby Album - page 2
Here is page 2 of the Baby album. I wanted to have two pregnancy scrapbook pages side by side in the album so I left the first page blank to be used later on. My thoughts are to write a 'Dear Baby' letter and insert it on the first page of the album.
I used an owl paper background and added 3 pictures, all of my pregnant belly :).
I added a few flowers, some glitter to accent and a few rub-ons for text. Since this page is going beside the first in my album I wanted to ensure they displayed well together.
I used an owl paper background and added 3 pictures, all of my pregnant belly :).
I added a few flowers, some glitter to accent and a few rub-ons for text. Since this page is going beside the first in my album I wanted to ensure they displayed well together.
I rubbed on glitter with my fingers on the flower stems to make them shiny. I think this is when I started getting addicted to glitter.... you'll see what I mean in the scrapbooking pages to come.
Here I added glitter on this plain silver frame, yes the glitter addiction is definately becoming evident, and a little owl embellishment with more glitter of course.
VoilĂ , my first two pages on pregnacy are now done. Here's what pages 1 & 2 both together look like. I love it!!Baby Album - page 1
So here it is, my first scrapbooking page. Please know that I have never attended a course or received any training other than watching tutorial videos online. Since this page, I have acquired more knowledge on various techniques and have of course purchased the tools and supplies needed to enhance my scrapbooking pages. As the Baby Album progresses you will notice more detail and I will be able to share these techniques with you.
After some thought on how to present the first page in the baby album I decided to go with the obvious, a few pics of me pregnant. Since I didn't know whether I was having a boy or a girl I decided to go with that as my theme. Therefore, I split my 12 x 12 page in half and devoted one side for 'Girl' and the other 'Boy'.
I completed the page with a few word rub-ons and a glittered swirl at the bottom for more dimension.
All products used were acid free and purchased at my local discount store. Stay tuned, more pages to be posted very soon.
After some thought on how to present the first page in the baby album I decided to go with the obvious, a few pics of me pregnant. Since I didn't know whether I was having a boy or a girl I decided to go with that as my theme. Therefore, I split my 12 x 12 page in half and devoted one side for 'Girl' and the other 'Boy'.
I used pink and blue baby cardstock for my background, added chipboard letters to spell out 'Girl' and 'Boy' in various colors and sizes. I also added some glitter to bring out the design on the chipboard.
I positioned two 4x6 picitures and added 3 paper flowers on top of each other for added dimension and attached all together with a brad. I added a silk ribbon on top of two glittered flowers for interest and added a few little colored plastic flower shapes on the top of the page above the title and around the bottom picture frame just to make it stand out a little more.
I completed the page with a few word rub-ons and a glittered swirl at the bottom for more dimension.
All products used were acid free and purchased at my local discount store. Stay tuned, more pages to be posted very soon.
Subscribe to:
Posts (Atom)